

If you’ve ever tried making Valentine sugar cut-out cookies only to end up with puffy blobs instead of crisp hearts, you’re not alone. That’s why this recipe is a total game-changer. It uses a no-chill sugar cookie dough that’s ready to roll the moment it’s mixed—no waiting, no refrigeration, and no spreading in the oven.
These cookies bake up soft in the center, smooth on top, and sharp around the edges—making them the perfect base for royal icing designs, sprinkles, and festive Valentine decorations.
Table of Contents
- Why These Valentine Sugar Cut-Out Cookies Work
- Tools You’ll Need for Decorating Sugar Cookies
- Ingredients for Valentine Sugar Cut-Out Cookies
- How to Make Valentine Sugar Cut-Out Cookies
- Royal Icing for Valentine Sugar Cookies
- How to Decorate Valentine Sugar Cookies
- Recipe Notes & Pro Tips
- How to Store Valentine Sugar Cut-Out Cookies
- Flavor Variations & Custom Ideas
- Make-Ahead & Gifting Tips
- FAQs & Troubleshooting

Why These Valentine Sugar Cut-Out Cookies Work
Whether you’re making treats for your kids’ classroom, hosting a Galentine’s party, or creating edible gifts, these decorated sugar cookies for Valentine’s Day are guaranteed to impress.
- No chill time required – mix, roll, cut, and bake immediately.
- Holds its shape – perfect for hearts, XOs, and themed cutters
- Soft but sturdy texture – ideal for royal icing
- Beginner-friendly decorating
- Perfect for gifting, parties, and cookie boxes
Tools You’ll Need for the Best Valentine Sugar Cookies

For smooth baking and decorating, these tools make everything easier:
- Non-stick rolling pin – keeps dough even and smooth
- Heart-shaped cookie cutters – classic Valentine designs
- Silicone baking mats or parchment paper – prevent sticking
- Piping bags & squeeze bottles – for clean icing lines
- Gel food coloring set – vibrant colors without thinning icing
- Meringue powder – essential for royal icing that dries firm
(These are all easy to find on Amazon and make decorating faster and more professional.)
Ingredients You’ll Need
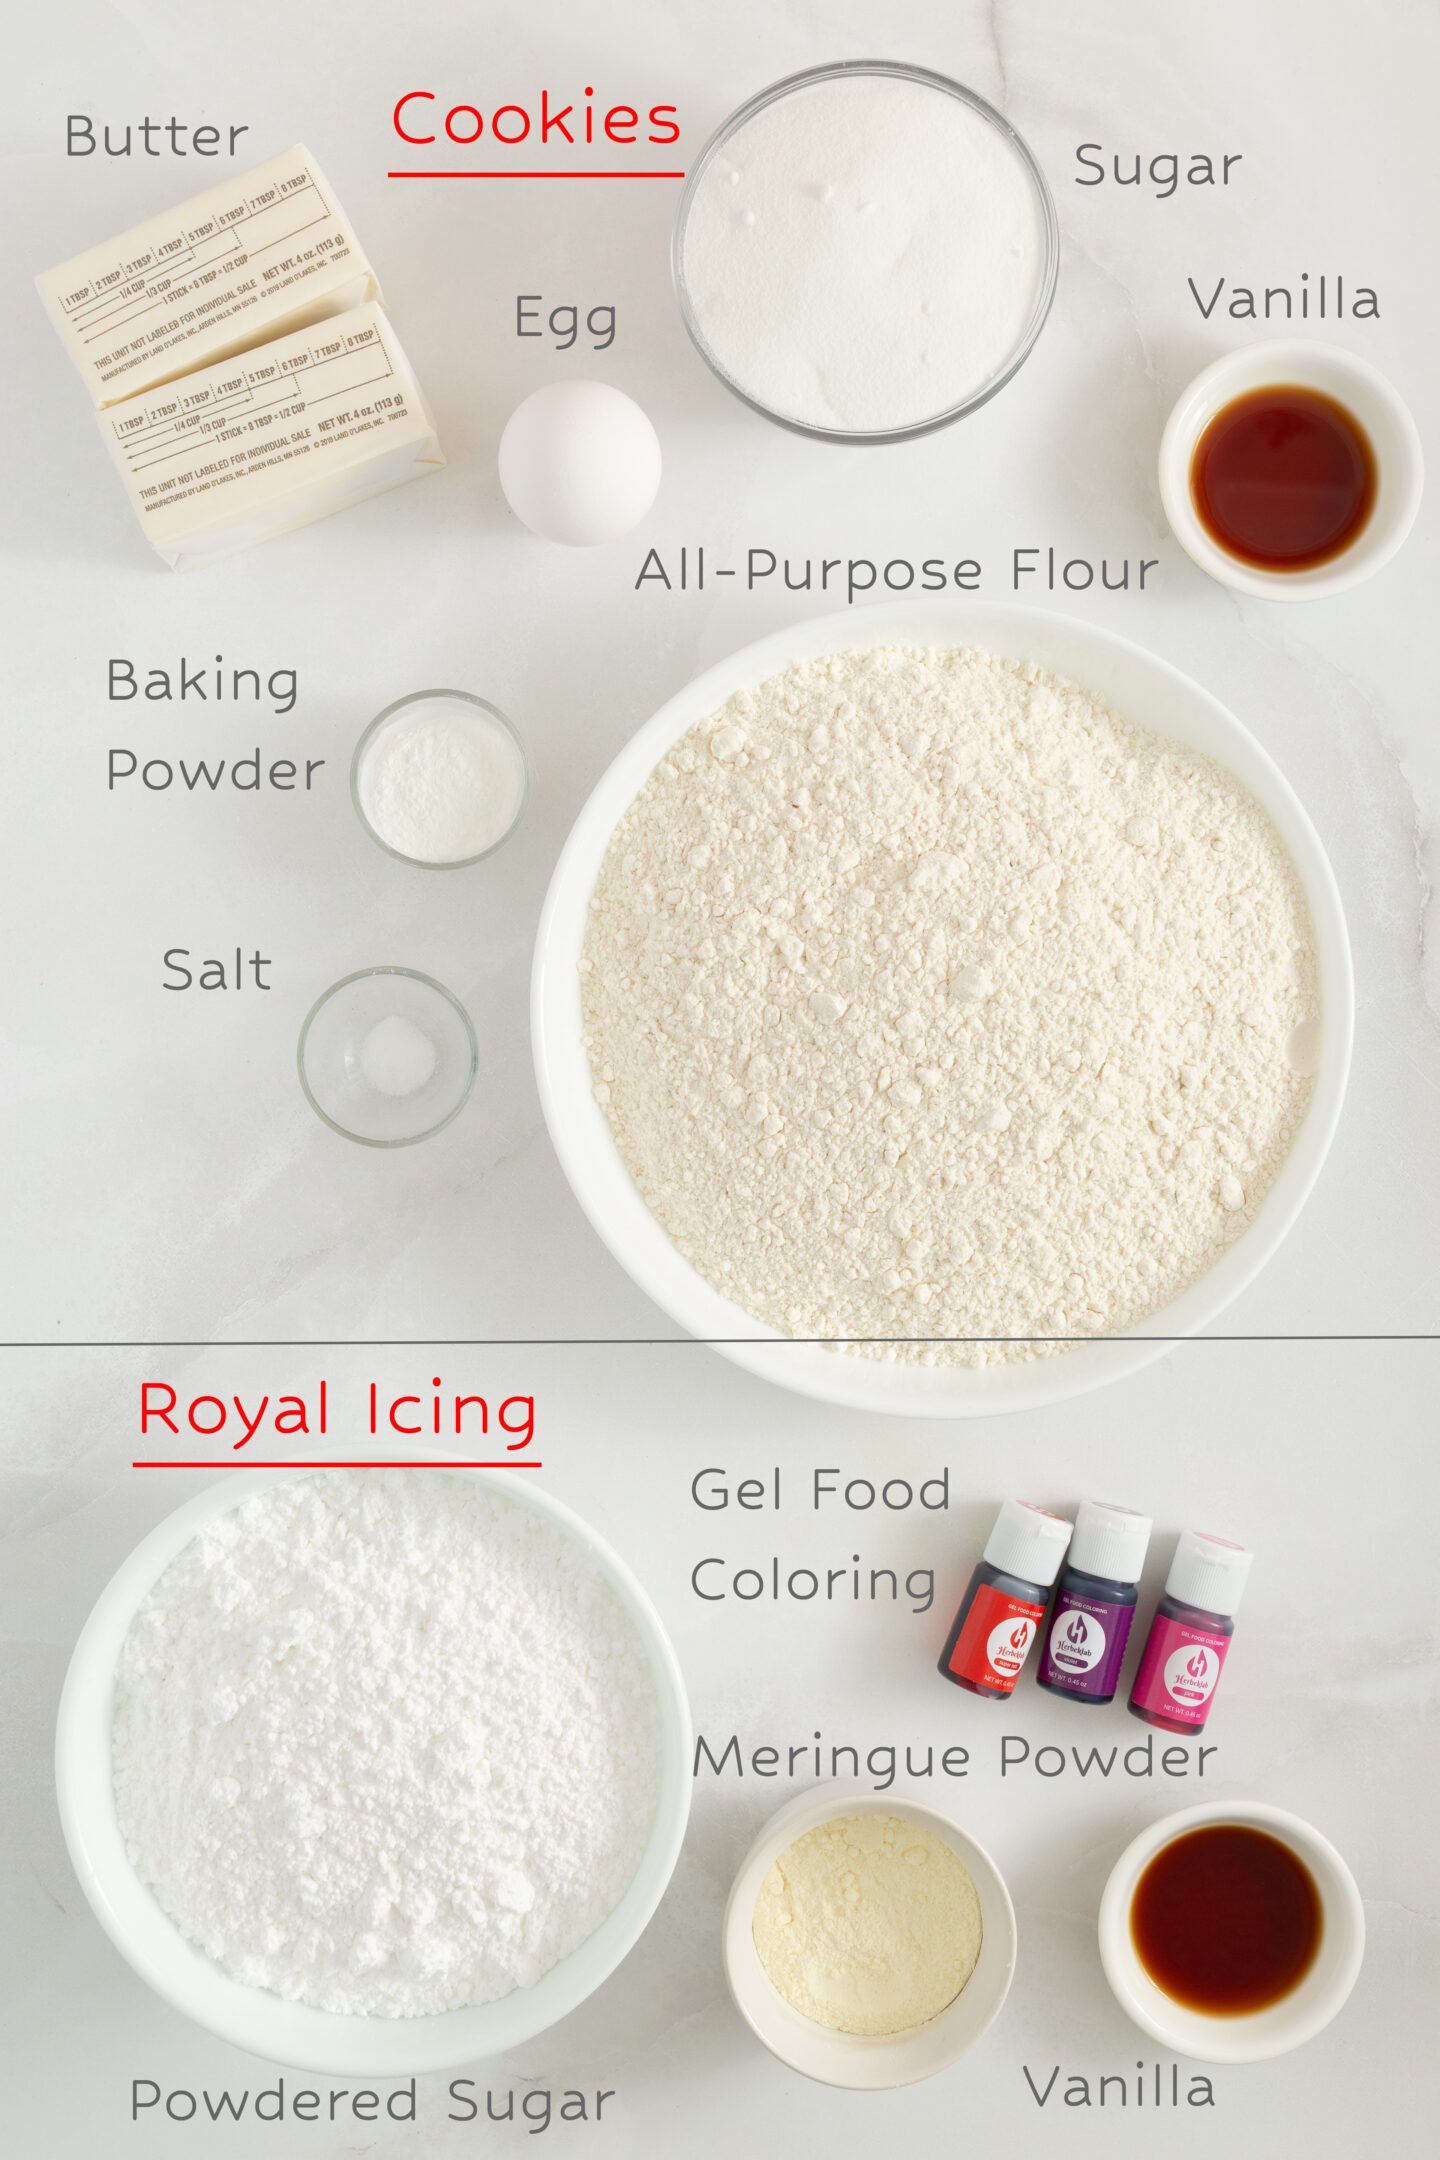
Sugar Cookies (No-Chill Dough)
- 2¼ cups all-purpose flour (spooned & leveled)
- ½ teaspoon baking powder
- ¼ teaspoon salt
- ¾ cup unsalted butter, softened
- ¾ cup granulated sugar
- 1 large egg, room temperature
- 2 teaspoons vanilla extract
- Sprinkles, sanding sugar, or edible glitter (optional)
Royal Icing
- 4 cups powdered sugar
- 3 tablespoons meringue powder
- 8 tablespoons water (room temp), plus more if needed
- 1 teaspoon vanilla extract
- Gel food coloring
How to Make Valentine Sugar Cut-Out Cookies
1. Mix the Dry Ingredients
Whisk flour, baking powder, and salt in a bowl.
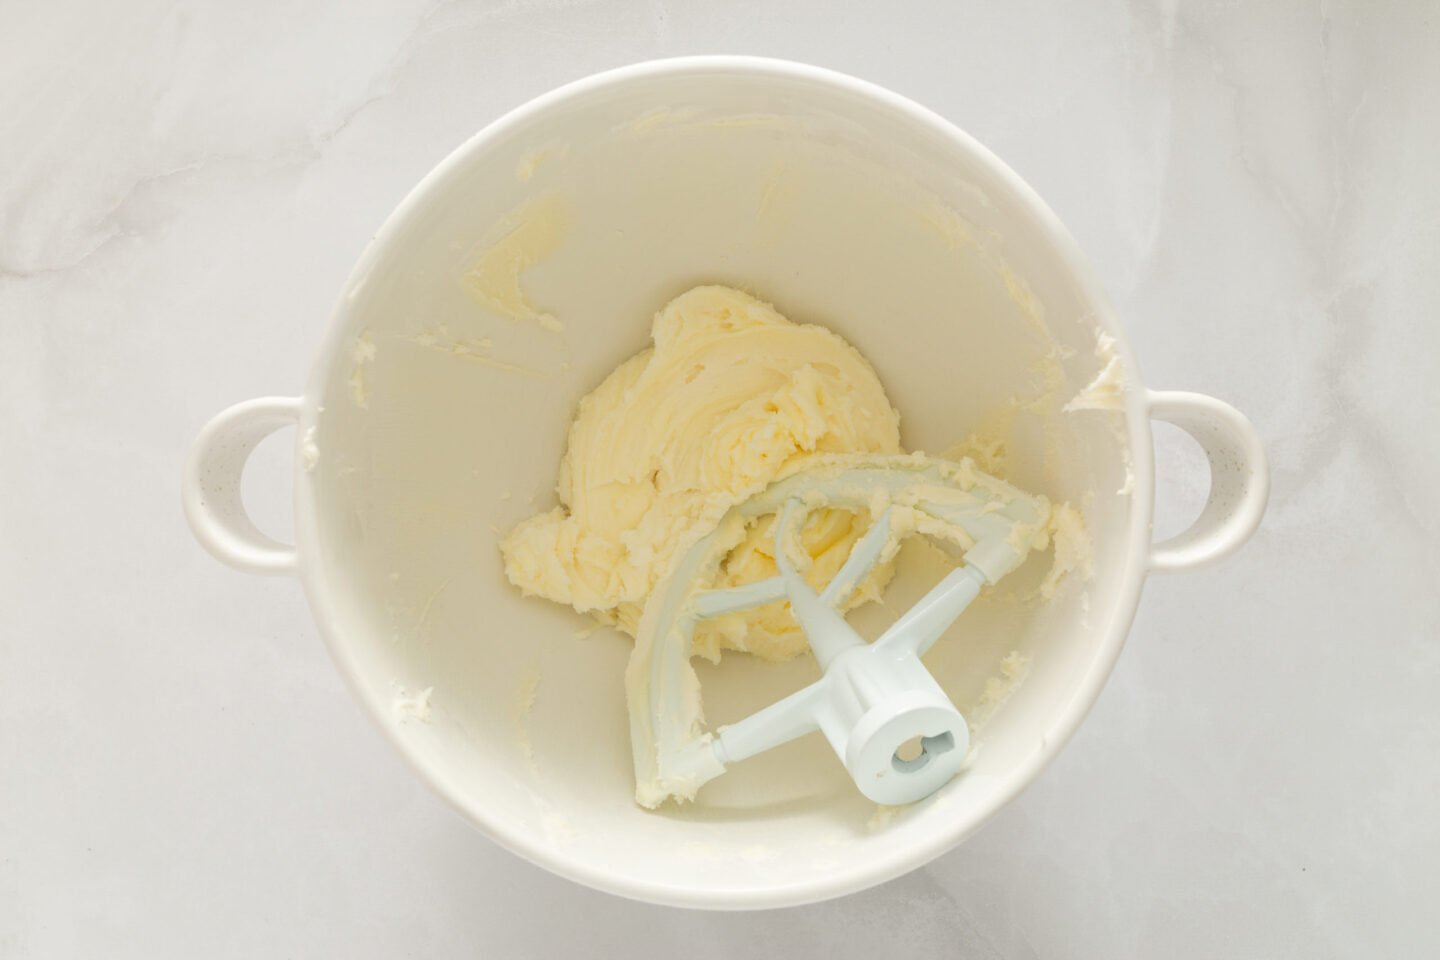
2. Cream the Butter & Sugar
Beat butter and sugar for 3 minutes until light and fluffy.
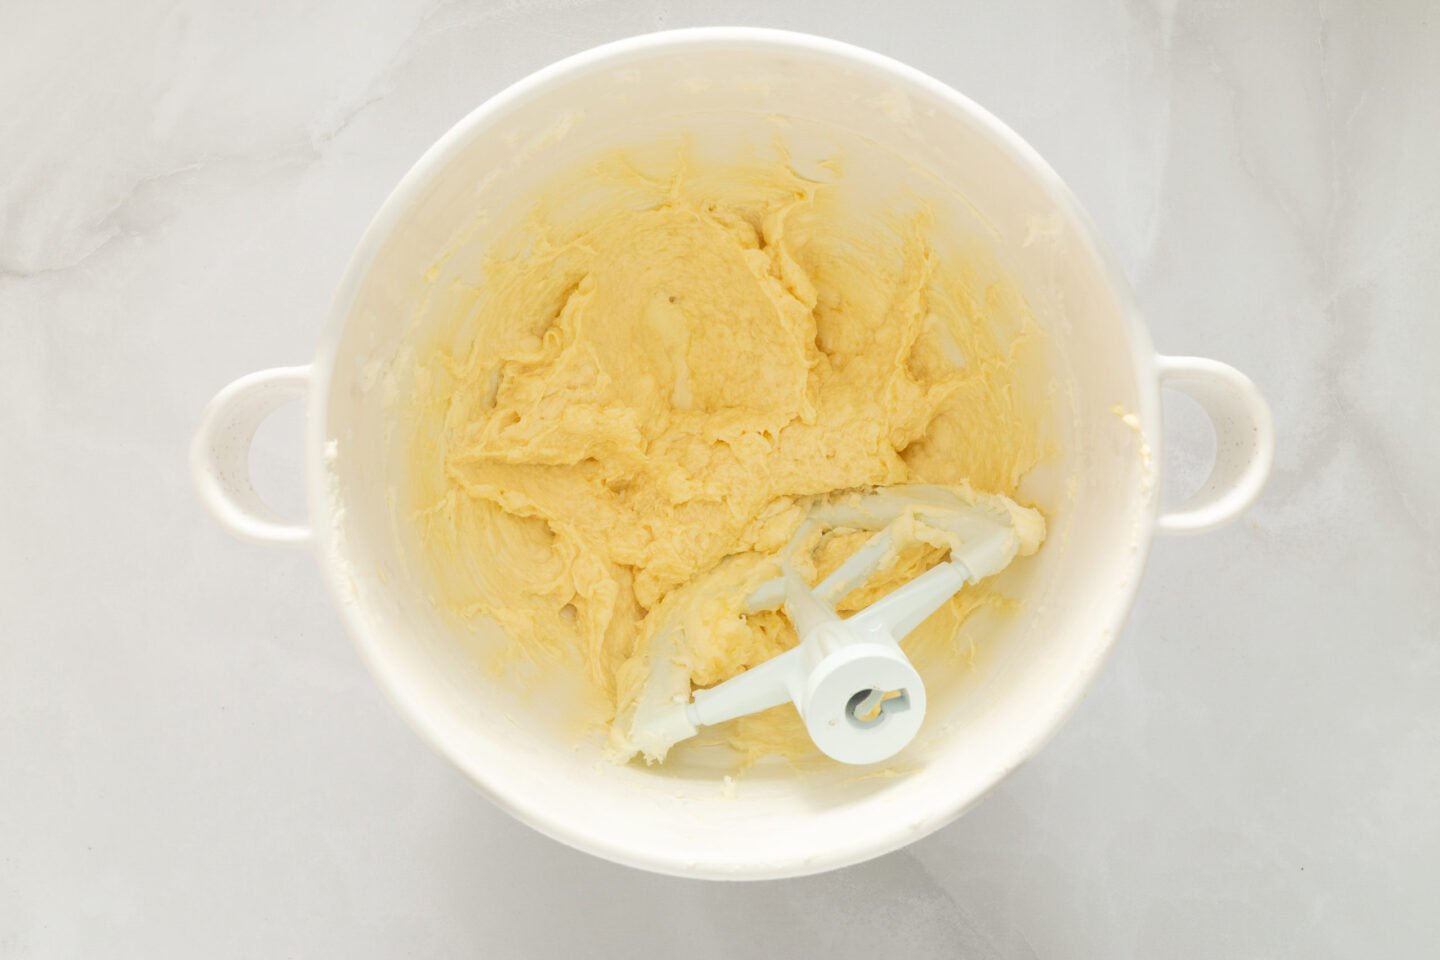
3. Add Egg & Vanilla
Mix until smooth.
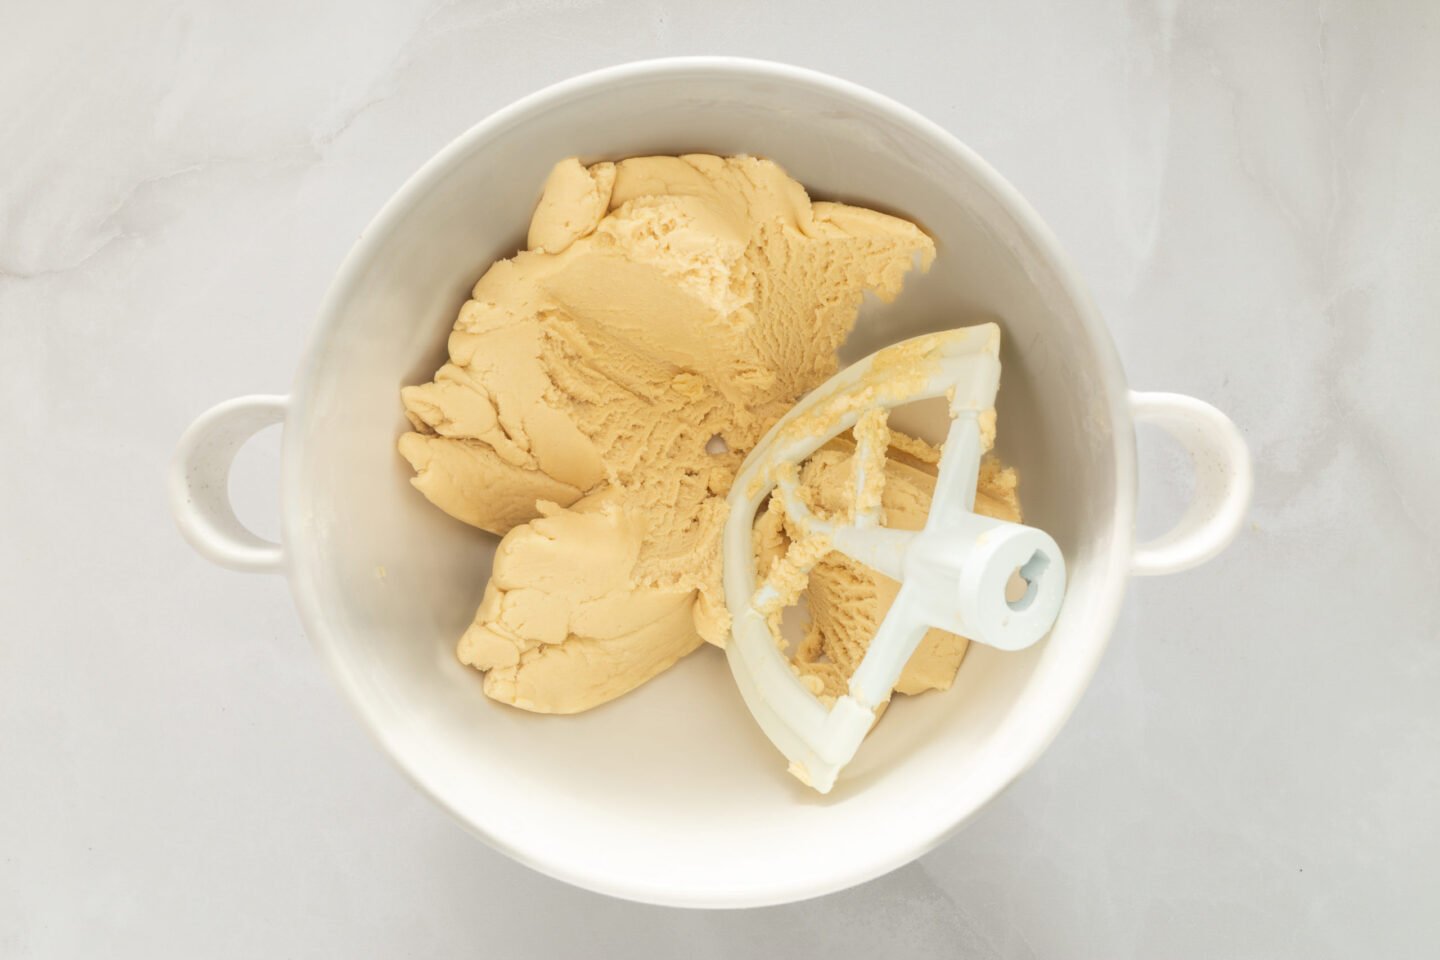
4. Combine
Add dry ingredients slowly until a soft, workable dough forms.
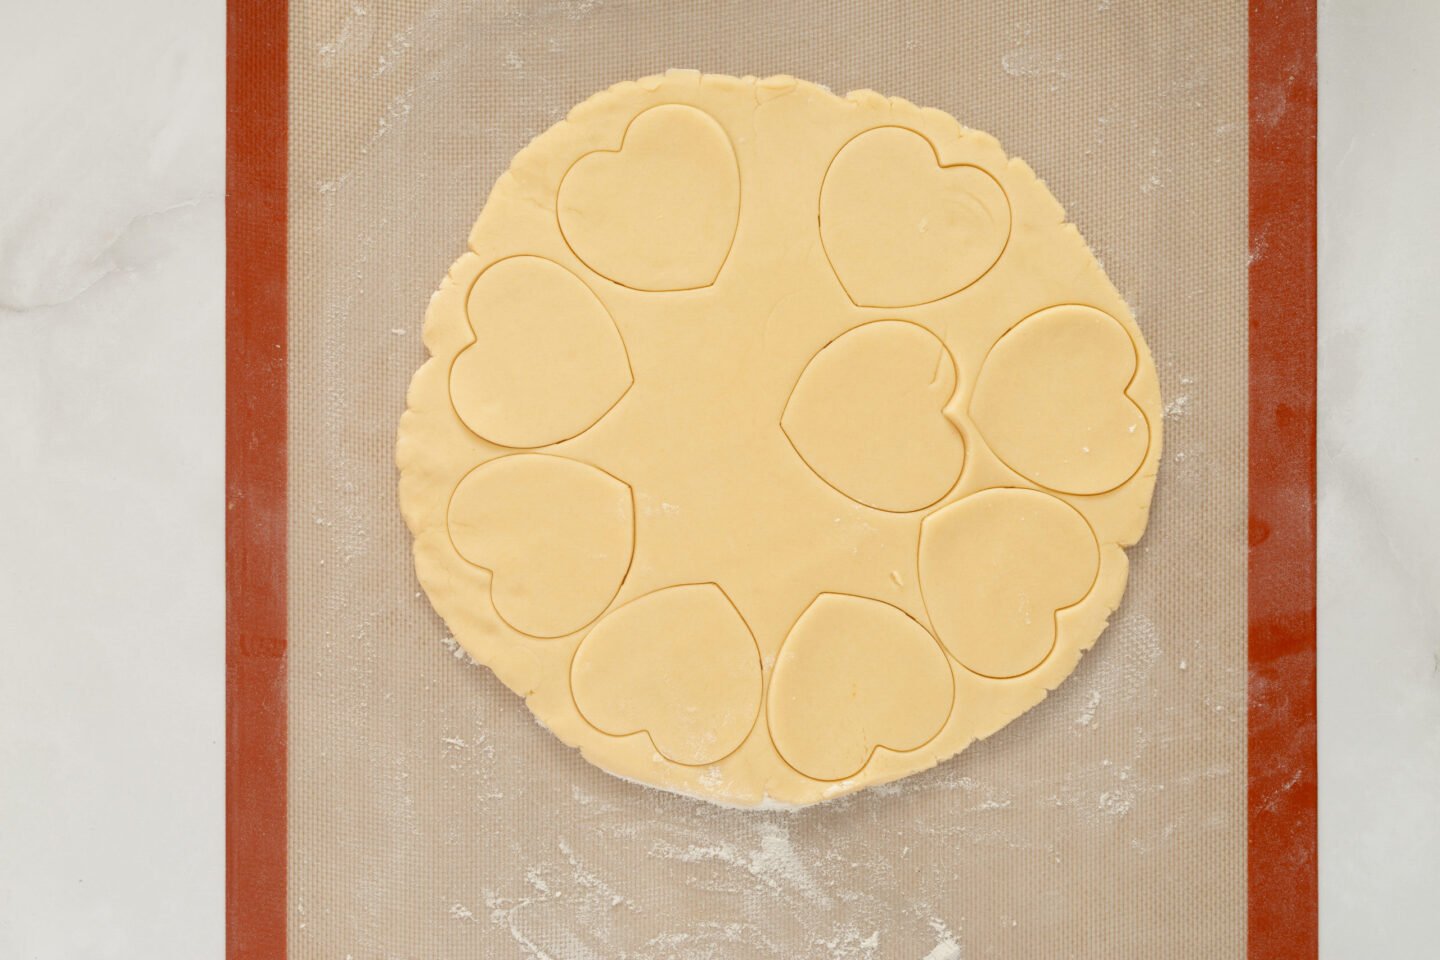
5. Roll & Cut (No Chilling!)
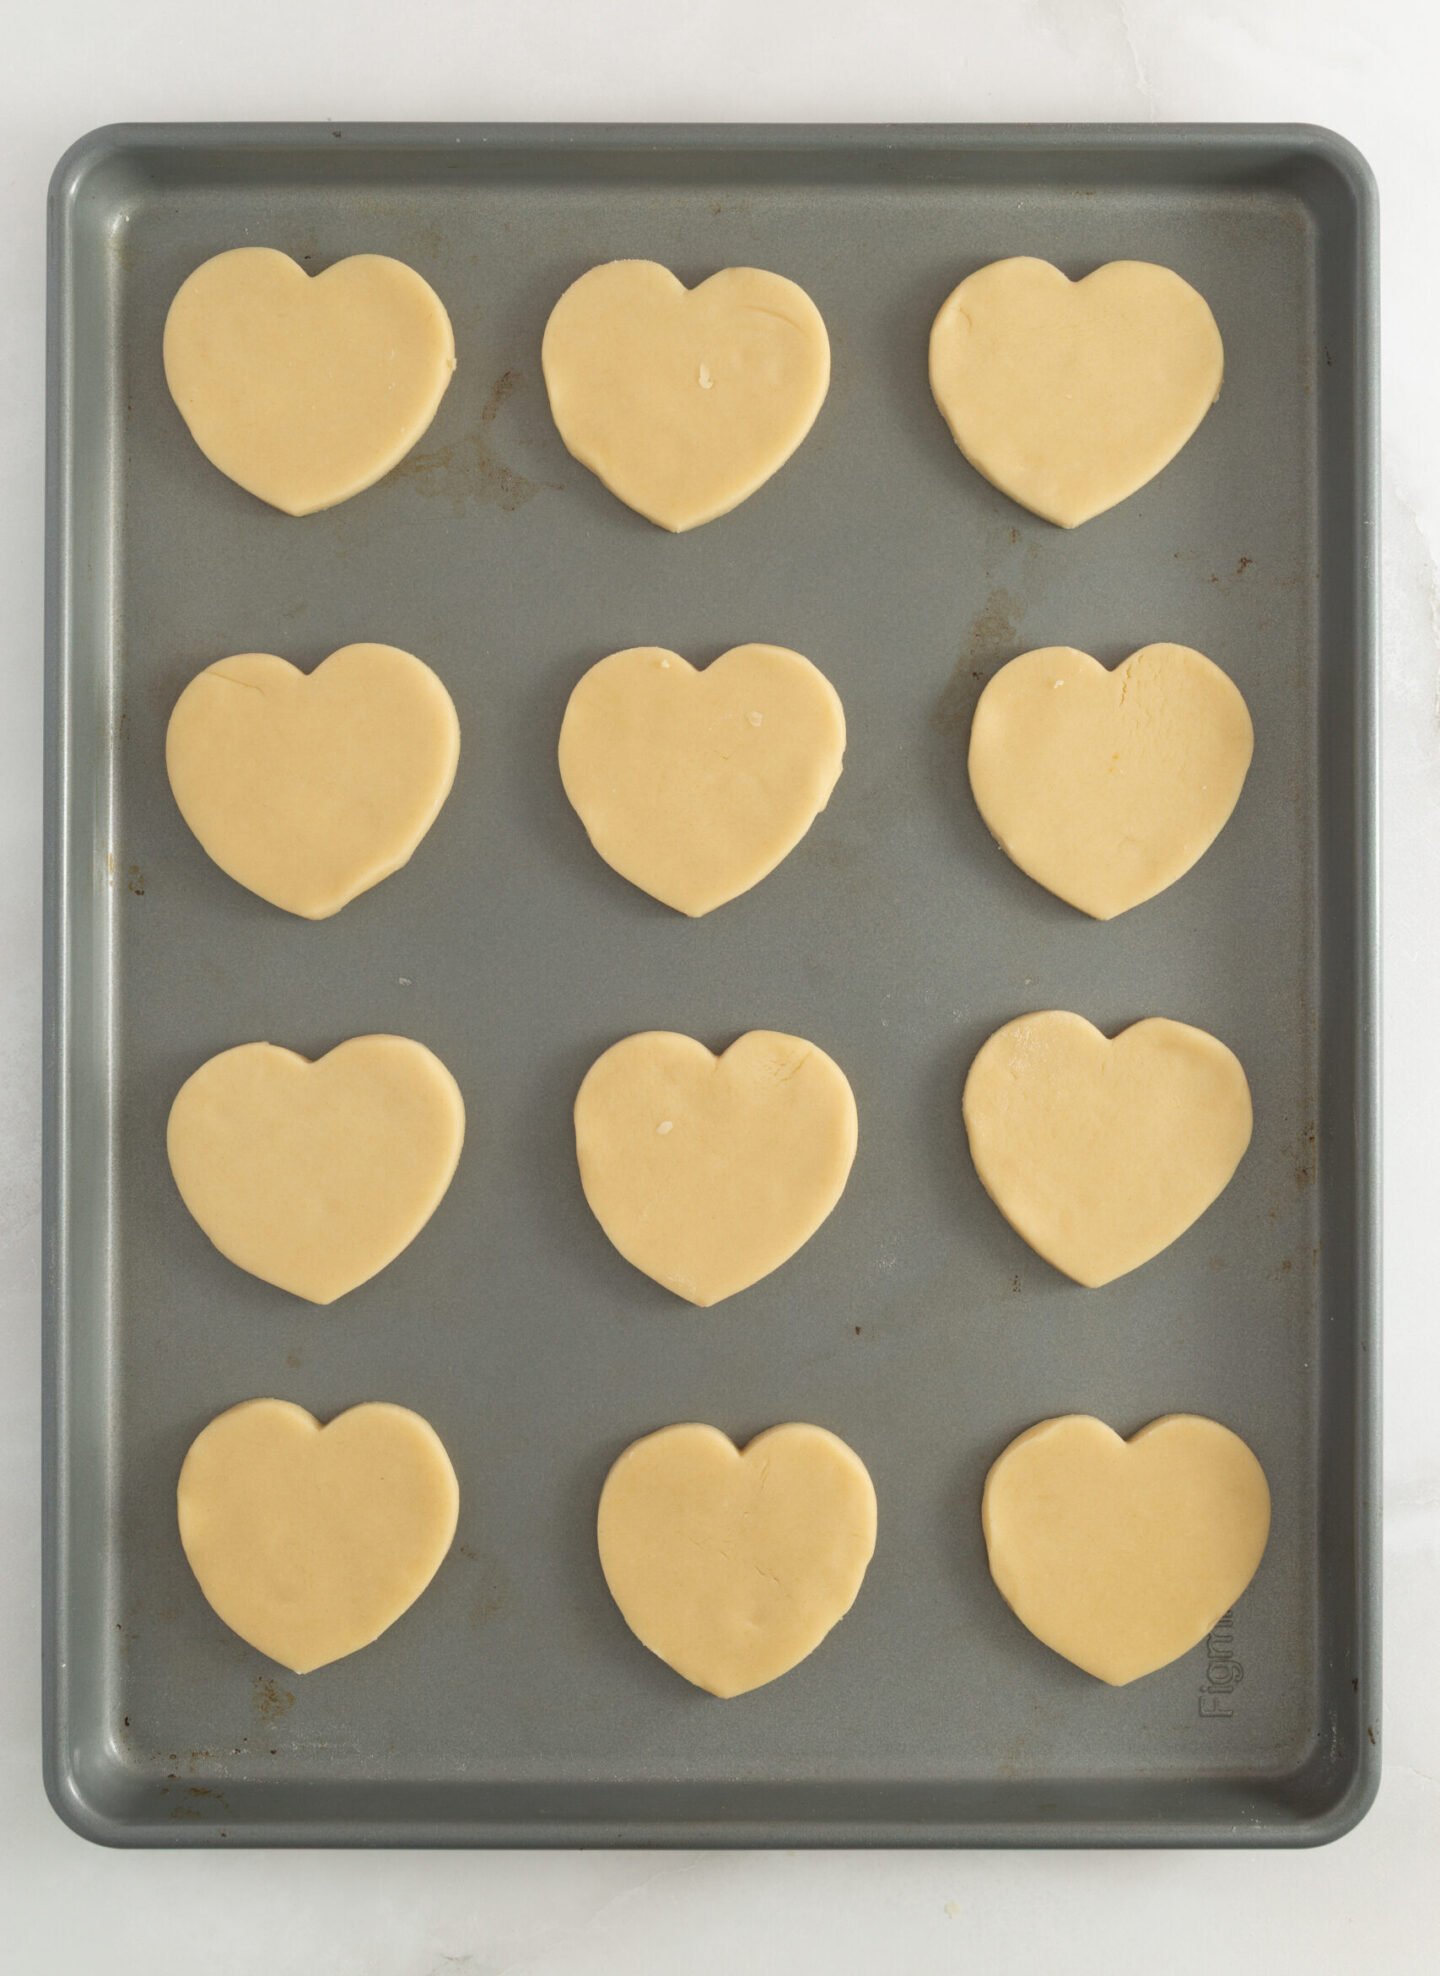
Divide the dough in half and roll each portion to ¼-inch thick on lightly floured parchment. Cut with Valentine cookie cutters.
6. Bake
Bake at 350°F (177°C) for 10–12 minutes, until the edges are set, but the tops are pale.
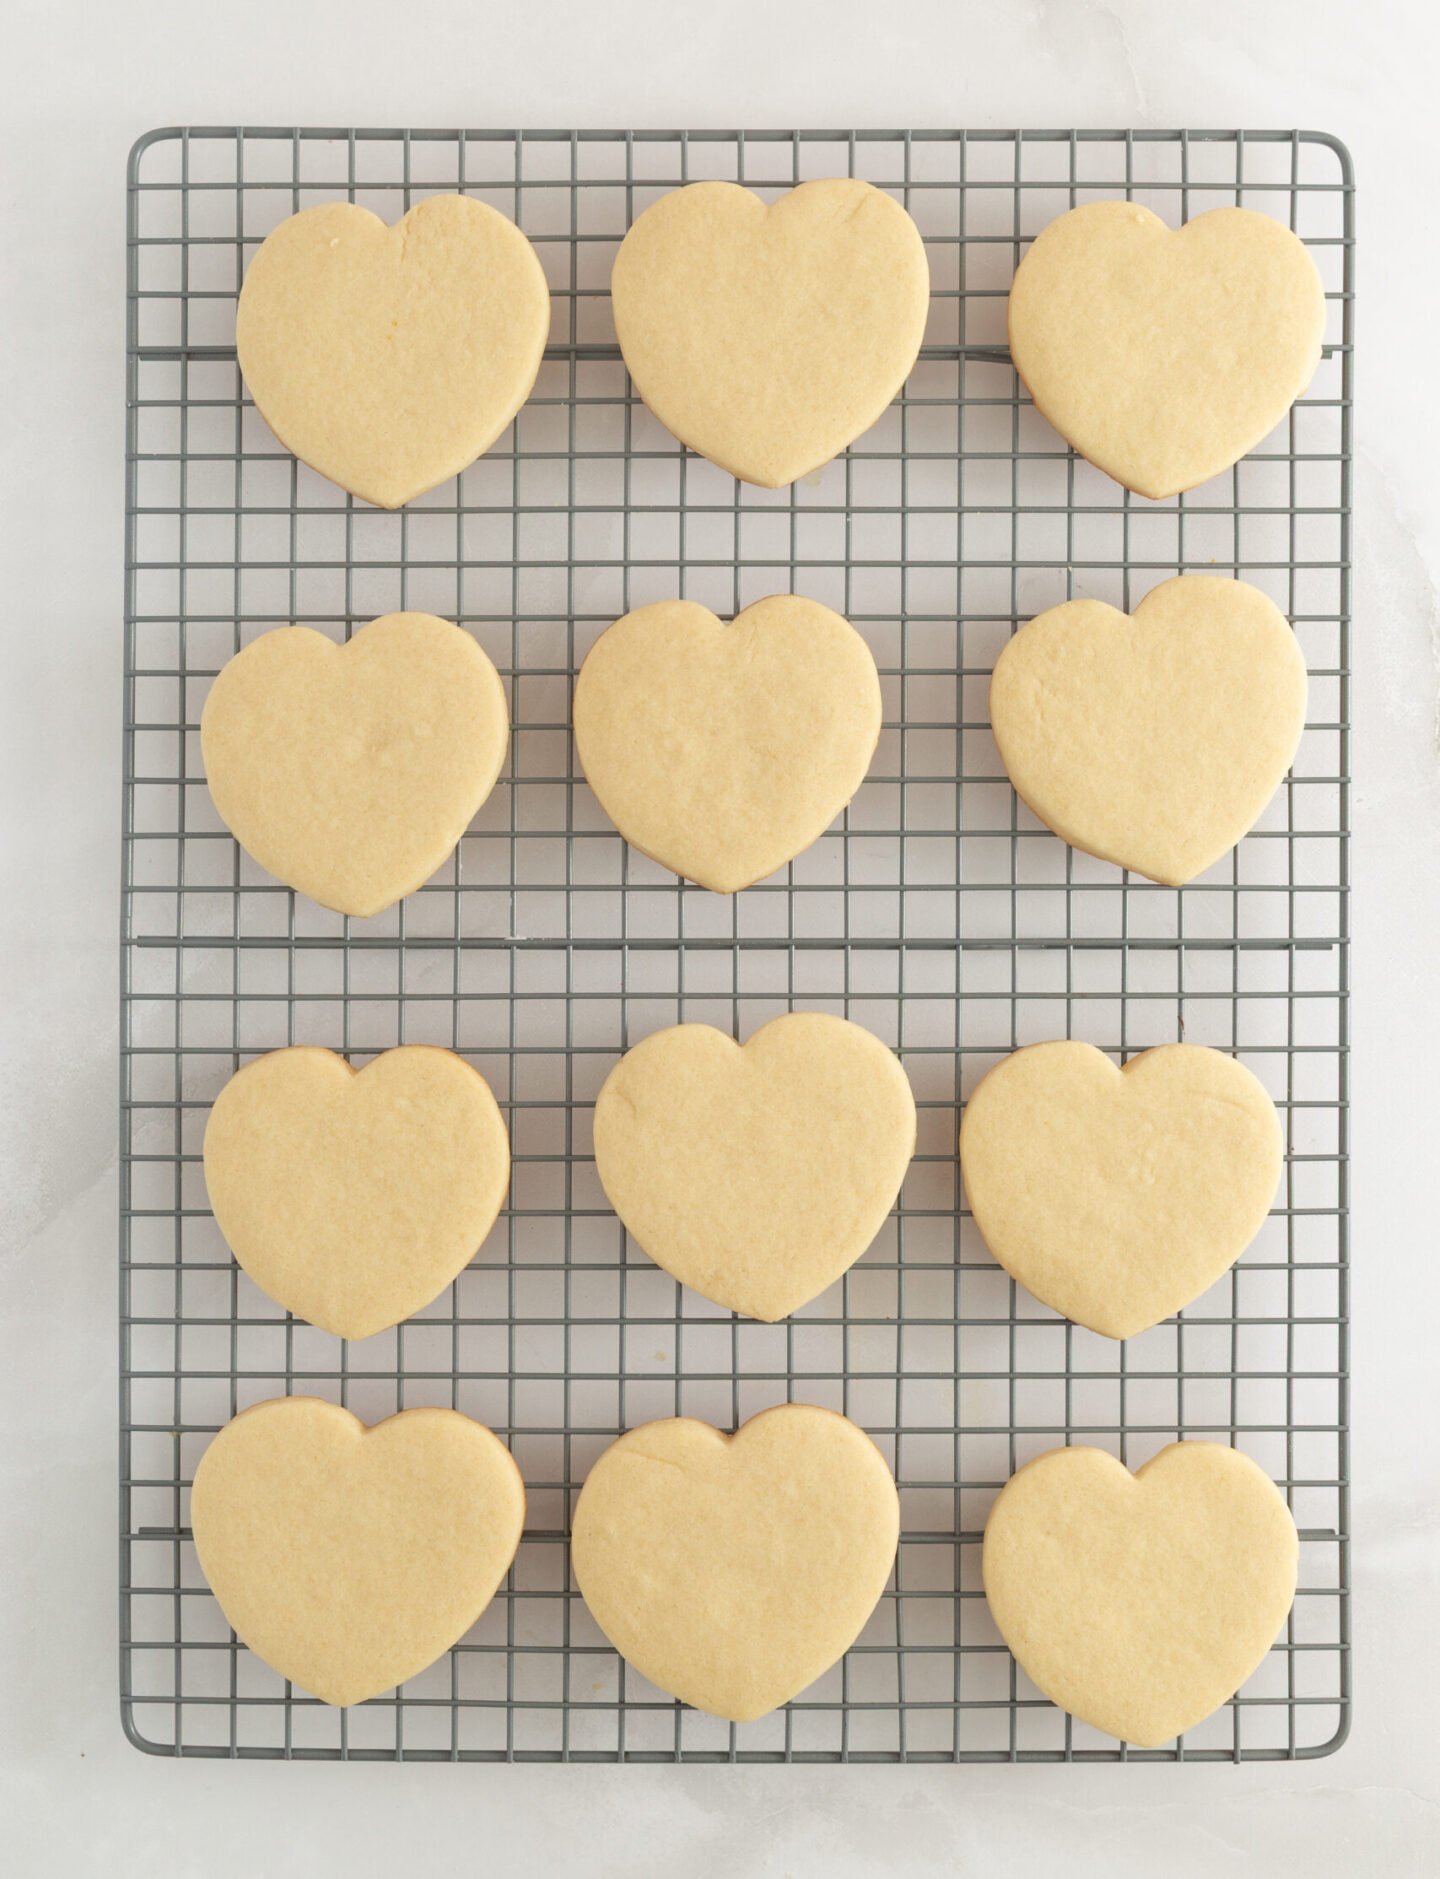
7. Cool
Cool completely before decorating. For best results, chill cookies briefly.
Royal Icing Instructions

1. Combine powdered sugar and meringue powder.
2. Add water and vanilla. Beat on high 1–2 minutes.
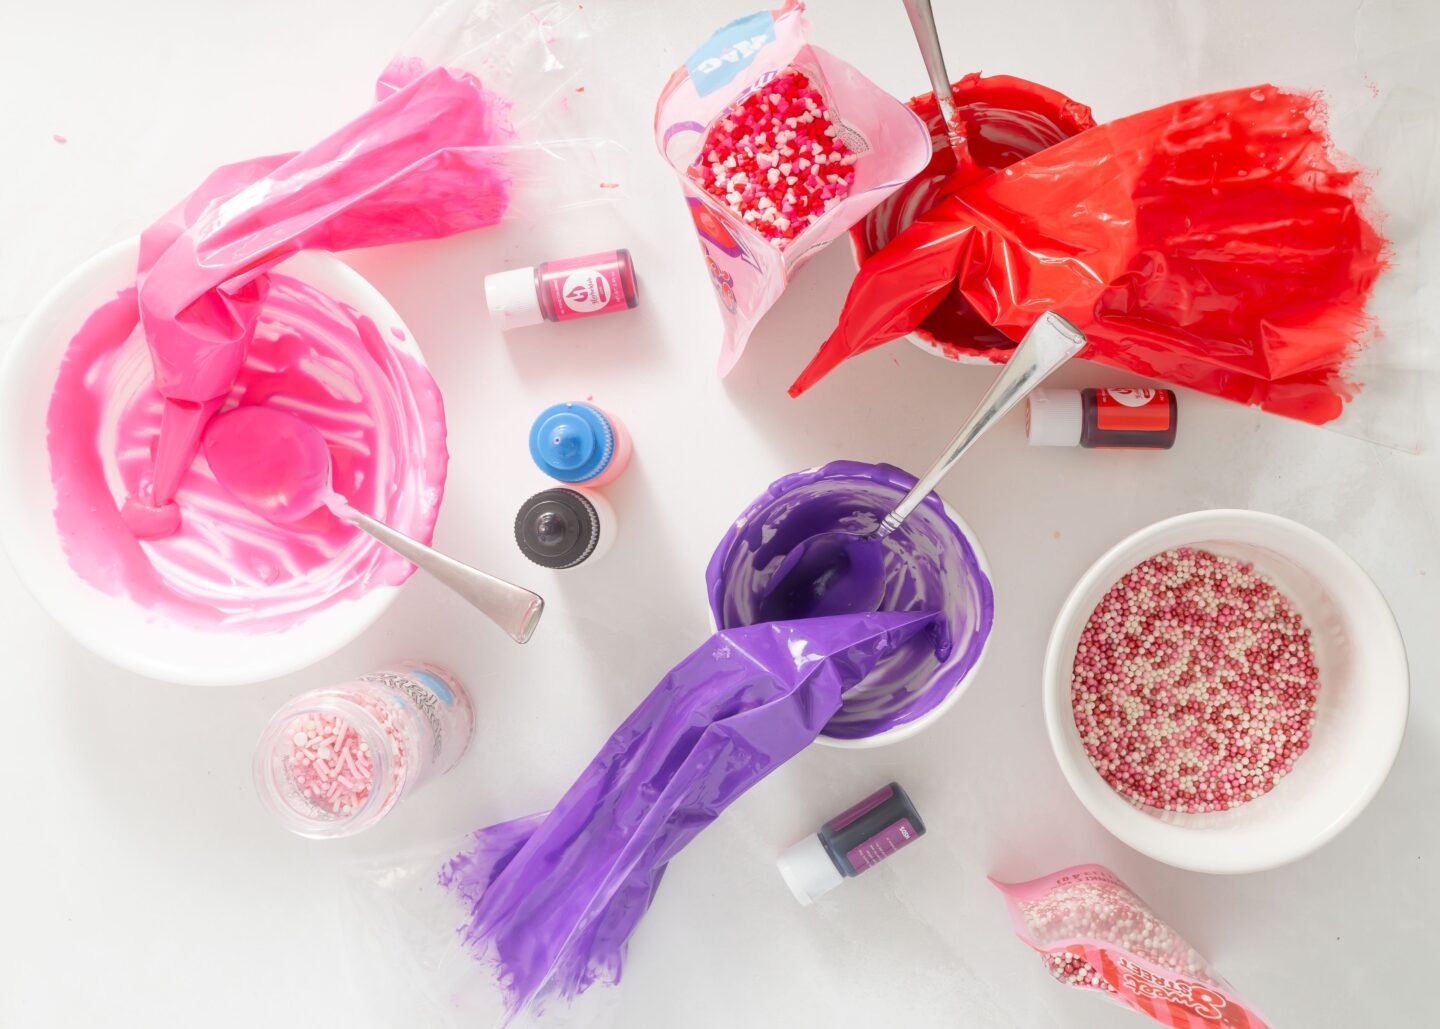
3. Adjust with small amounts of water or sugar.
4. Divide into bowls and color with gel food coloring.
Tip: Use thicker icing for outlines and thinner for flooding.
Decorating Your Valentine Sugar Cookies
Decorating is where Valentine sugar cut-out cookies really come to life. Whether you prefer simple, classic designs or more detailed patterns, working with royal icing allows you to create smooth finishes, clean lines, and festive Valentine shapes that dry firm and stack beautifully. Below are two reliable decorating methods—both beginner-friendly and easy to customize depending on your time, tools, and design goals.
Before decorating, make sure cookies are completely cooled and lightly chilled. Cold cookies help royal icing set faster and prevent colors from bleeding or spreading beyond the outlines.

Piping Method (Best for Detailed Designs)
The piping method is ideal for decorated Valentine sugar cookies that feature hearts, messages, color blocking, or multiple icing shades. This technique offers the most control and produces the cleanest, most professional-looking results.
- Start by filling a piping bag fitted with a small round tip (or a piping bag with a small snip at the tip) with thicker royal icing. Carefully outline the edges of the chilled cookie, following the shape closely. Allow the outline to set for 5–10 minutes, or until it feels dry to the touch.
- Once the outline has set, switch to a thinner “flood” icing and gently fill in the center of the cookie.
- Use a toothpick or scribe tool to spread icing evenly and pop any air bubbles.
- Let cookies rest flat until fully dry.
This method works especially well for layered designs. Additional details—such as dots, lettering, or contrasting colors—can be piped on once the base layer has dried.

Dipping Method (Best for Simple, Uniform Cookies)
The dipping method is a faster option for decorating Valentine sugar cookies, offering a smooth, polished look with minimal effort. It’s especially helpful when decorating a large batch, creating classroom treats, or gifting.
- Pour flood-consistency royal icing into a shallow bowl.
- Holding a chilled cookie by the edges, gently dip the top into the icing.
- Lift the cookie and allow excess icing to drip back into the bowl, lightly tapping if needed.
- Turn the cookie upright and place it on parchment paper or a wire rack to dry.
- Once the base icing has set, you can add simple piped details or sprinkles on top for extra decoration.
Drying & Setting Time
Royal icing dries to a smooth, firm finish, making these cookies perfect for stacking, packaging, and gifting. Drying time typically ranges from 2 to 6 hours, depending on icing thickness, humidity, and room temperature. For best results, allow cookies to dry overnight before storing or packaging.
Avoid covering cookies while the icing is still wet, and keep them in a cool, dry area for optimal results.
Decorating Tips for Best Results
- Always keep royal icing covered when not in use to prevent crusting.
- Work with one color at a time and clean piping tips between colors.
- Use gel food coloring to maintain icing consistency.
- If icing begins to thicken, add water a few drops at a time and mix thoroughly.
With these techniques, decorating Valentine sugar cut-out cookies with royal icing becomes both manageable and fun—perfect for beginners and experienced home bakers alike.
How to Store Valentine Sugar Cut-Out Cookies

Proper storage is essential for maintaining texture, flavor, and decoration quality—especially if you’re making these cookies ahead for Valentine’s Day events or gifting.
Unbaked Sugar Cookie Dough
Wrap dough tightly in plastic wrap and refrigerate for up to 3 days. For more extended storage, freeze for up to 3 months. Thaw overnight in the refrigerator before rolling and cutting.
Baked, Undecorated Cookies
Once completely cooled, store cookies in an airtight container at room temperature for up to 5 days. Place parchment paper between layers to prevent sticking or breakage.
Decorated Valentine Sugar Cookies
After royal icing has fully hardened, store decorated cookies in an airtight container at room temperature for up to 1 week. Keep cookies away from humidity, heat, or direct sunlight, which can soften icing or cause colors to bleed.
Freezing Decorated Cookies
Thoroughly dried decorated cookies are freezer-friendly. Arrange the cookies in single layers, separated by parchment paper, in a freezer-safe container. Thaw at room temperature uncovered to prevent condensation from forming on the icing.
Valentine Sugar Cookie Variations & Flavor Ideas

This cut-out sugar cookie recipe, which holds its shape, is easy to customize without sacrificing structure.
- Flavor the Dough:
- Swap vanilla extract for lemon, almond, orange, or peppermint extract for subtle flavor variations perfect for Valentine’s Day.
- Flavor the Royal Icing:
- Add a small amount of peppermint, coconut, lemon, or almond extract to the icing for themed designs. Use sparingly to avoid overpowering the cookies.
- Tint the Dough:
- Knead gel food coloring directly into the dough for colored Valentine cookies. Gel coloring is preferred to prevent changing the dough consistency.
- Add Citrus or Warm Spices:
- Incorporate lemon or orange zest, cinnamon, or nutmeg into the dough for added depth without affecting bake quality.
- Adjust Texture:
- Roll the dough slightly thicker for a softer center or slightly thinner for crisp edges, and adjust the baking time to avoid browning.
Make-Ahead & Gifting Tips for Valentine Sugar Cut-Out Cookies

These Valentine sugar cut-out cookies are perfect for planning ahead and gifting.
- Bake Ahead:
- Cookies can be baked and frozen undecorated up to 3 months in advance, making them ideal for Valentine’s prep.
- Decorate in Stages:
- Decorate cookies in layers, allowing icing to dry completely between steps for cleaner designs.
- Packaging for Gifting:
- Once icing is fully set, cookies can be stacked and packaged in cellophane bags, bakery boxes, or tins. Use parchment paper between layers for protection.
- Classroom Treats:
- These cookies hold up well during transport and handling, making them great for classroom exchanges and party platters.
- Shipping Cookies:
- If mailing cookies, allow icing to dry for at least 24 hours. Pack cookies tightly with cushioning to prevent movement.
Valentine Sugar Cut-Out Cookies FAQs & Troubleshooting

Why did my sugar cookies spread?
Cookies may spread if the butter is too soft or warm. Make sure butter is softened—not melted—and avoid working in a hot kitchen.
Why aren’t my cookie edges sharp?
Warm dough or overworked dough can cause edges to soften. Rolling immediately after mixing and briefly chilling cut cookies before baking can help.
Why are my cookies dry?
Too much flour or overbaking can dry out cookies. Spoon and level the flour accurately, and remove the cookies while the tops are still pale.
How do I know my royal icing is the right consistency?
Royal icing should fall back into itself and smooth out within 5–10 seconds. Thicker icing is best for outlines; thinner icing works for flooding.

Can I make Valentine sugar cookie dough ahead of time?
Yes. Dough can be refrigerated or frozen before or after rolling. Always thaw gently before use.
Can I decorate cookies the same day they’re baked?
Yes, but chilling baked cookies first helps royal icing set faster and improves overall appearance.
Why is my royal icing not drying?
High humidity or incorrect ratios can prevent icing from setting. Use meringue powder and keep icing covered when not in use.

Can I skip the meringue powder?
No. Meringue powder is essential for royal icing to be dry, firm, and stackable.
These Valentine sugar cut-out cookies are everything you want in a holiday treat—easy, beautiful, and absolutely delicious. With a no-chill sugar cookie dough and classic royal icing, you can create bakery-style cookies right at home.
Perfect for gifting, parties, and creating memories with your family.
MORE YUMMY VALENTINE TREATS TO TRY!
Buttercream Sugar Cookies {Decorated for Valentine’s Day}
Whoopie Pies Recipe – Perfect for Valentine’s Day!
Chocolate-Covered Pretzels
Red Velvet Crinkle Cookies
*This post may contain affiliate links. As an Amazon Associate, I earn from qualifying purchases. This means that when you click on certain links and make a purchase, I may earn a small commission—at no extra cost to you. I only recommend products I personally use, love, or believe will be helpful to my readers. Thank you for supporting Hip Mama’s Place and the content I share!
Print
Valentine Sugar Cut-Out Cookies | No-Chill Sugar Cookie Recipe
- Total Time: about 3 hours (including chilling)
- Yield: about 24 cookies (3–4 inch 1x
Description
These Valentine sugar cut-out cookies use a no-chill dough that holds its shape and classic royal icing, making them perfect for decorating hearts, gifting, and Valentine’s Day treats.
Ingredients
For the Sugar Cookies:
2¼ cups all-purpose flour (about 281 g), spooned and leveled, plus more for rolling
½ teaspoon baking powder
¼ teaspoon salt
¾ cup unsalted butter (12 tablespoons / 170 g), softened
¾ cup granulated sugar (150 g)
1 large egg, room temperature
2 teaspoons vanilla extract
Sprinkles, sanding sugar, or edible glitter, optional
For the Royal Icing:
4 cups powdered sugar
3 tablespoons meringue powder
8 tablespoons water, room temperature, plus more as needed
1 teaspoon vanilla extract (or other extract)
Gel food coloring
Instructions
Cookie Instructions:
- Whisk the flour, baking powder, and salt together in a medium bowl and set aside.
- In a large mixing bowl, beat the softened butter and sugar until light and creamy, about 3 minutes. Scrape the bowl as needed to ensure even mixing.
- Add the egg and vanilla and mix until fully combined.
- Add the dry ingredients and mix on low speed just until a soft, workable dough forms. The dough should feel smooth and pliable, not sticky. If needed, add additional flour 1 tablespoon at a time, stopping as soon as the dough releases cleanly from the bowl.
- Divide the dough in half. Place each portion on lightly floured parchment paper or a silicone baking mat and roll immediately to an even ¼-inch thickness.
- Cut into shapes using cookie cutters. Gather and reroll scraps as needed. Transfer cut cookies to parchment-lined baking sheets, spacing them about 2 inches apart.
- Bake at 350°F (177°C) for 10–12 minutes, removing the cookies when the edges are set and the tops remain pale. Avoid browning the edges.
- Let the cookies cool on the baking sheet for 5 minutes, then transfer to a wire rack to cool completely. For best decorating results, chill the cooled cookies briefly before icing.
Royal Icing Instructions:
- Combine the powdered sugar and meringue powder in a mixing bowl.
- Add 7 tablespoons of water along with the vanilla. Beat on high speed for 1–2 minutes, until the icing falls back into itself and smooths out within 5–10 seconds.
- Adjust the consistency with small additions of water or powdered sugar as needed. Keep the icing covered when not in use.
- For piping, reserve about ¼ of the icing for outlining (thicker consistency) and ¾ for flooding (thinner consistency).
- Divide the icing into separate bowls for coloring and tint with gel food coloring, mixing thoroughly.
Decorating Instructions:
- For piping (multiple colors): Outline the edges of a chilled cookie with icing and allow the outline to set. Once firm, fill in the sections with flood icing and let dry completely.
- For dipping (single color): Dip the top of a chilled cookie into a shallow bowl of icing, allow excess to drip off, then set upright to dry. Once the icing has hardened, additional details can be piped on top.
- Allow royal icing to harden fully—typically within 2–6 hours, depending on thickness and humidity.
- Prep Time: 40 minutes
- Cook Time: 10-12 minutes, bake time
A former school teacher, Jocelyn Brown created Hip Mama’s Place in 2007. Her motto for this blog is: get inspired, create and share! Jocelyn loves sharing about food and recipes, crafts, DIY projects and her random travels with her family. She also loves all things social media, but her latest obsession is Instagram.
Find me on: Web


It has been a while since I make cut out cookies. This recipe is perfect for my baking.
These are so super cute! I love the idea of decorating them as giant conversation hearts!