Easter is right around the corner and in our house, we make every occasion fun and festive by decorating our home, making Easter crafts and baking sweet goodies!
Thanks to A.C. Moore, I received craft supplies to make these fun projects for Easter! And just in time when I need some fun activity ideas to do with my kids for Spring break! 🙂
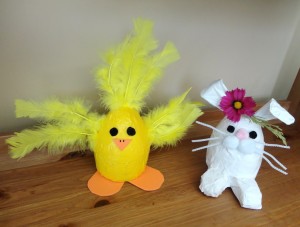
Today's craft is called Duck Tape Easter Bunny and Chick, aptly called because the projects both utilize duck tape! 🙂
Here are the supplies you need, all available to purchase at any A.C. Moore store near you!
SUPPLIES:
Duck Tape® Rolls:
Winking White, HKL0003020
Sunburst Yellow, 104537299
STYROFOAM™ Brand Foam by FloraCraft®:
5" Ostrich Egg (2), FCAEG4S
2-½" Hen Egg, FCAEG25S
Nicole™Crafts Pom Poms:
¼" Black, POM 8507, ½" Pink, Spring Mix POM 8612,
1" White, POM 8503, & 2" White, POM 8505
3-mm. Nicole™Crafts White Chenille Stems
CHE 201
Nicole™Crafts Orange Foamtastic™ Foam Sheet
FOM 305
Midwest Designs Yellow Feathers, FEA 9006
Sharpie® Ultra Fine Black Permanent Marker
SAN 37114
Fiskars® Non-Stick Scissors, FSK9994
Serrated Knife & Wire Cutters
Toothpicks
Awl or Knitting Needle
Daisy Flower with Leaves
Low-Temp Glue Gun & Glue
Craft Knife & Self-Healing Cutting Mat (Optional)
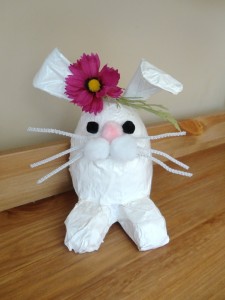
*Bunny Instructions: Refer to project photo for design placement.
1. With serrated knife, cut off a small part from large end of egg so the Bunny has a flat surface for sitting.
2. Cut hen egg in half lengthwise. Cut away small ends of both egg pieces for a flat end. Use toothpicks to connect feet to body.
3. Tear or cut 2" pieces of White tape & place on Bunny, overlapping each piece to cover body & feet.
4. For Bunny Ears: Bend chenille stem to make loop & twist one end around the other to secure, leaving a 1" end. Cover loop with White tape. Follow outline of ear shape, trimming excess tape away with scissors. Repeat for second ear. Punch two holes at top of head with awl or knitting needle. Insert ears in holes.
5. Cut three 6" lengths of chenille stem for whiskers. Glue whiskers to face. Glue eyes, nose, cheeks, & tail to Bunny, following photo for placement.
6. Cut daisy head & leaves away from stem, glue daisy & leaves between ears.
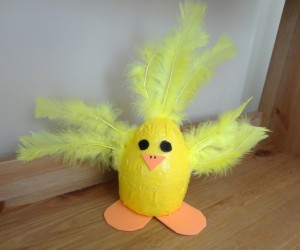
*Chick Instructions: Refer to project photo for design placement.
1. With serrated knife, cut off a small part from large end of egg so the Chick has a flat surface for sitting.
2. Tear or cut 2" pieces of Yellow tape & place on Chick, overlapping each piece to cover body.
3. Cut a 3" heart shape from Orange foam for feet & glue to Chick.
4. Cut a small triangle shape from Orange foam for beak & glue to Chick. Draw two small strokes side by side with marker for nostrils. Glue eyes to Chick. Reference photo for placement.
5. With awl, pre-punch holes where needed to insert feathers for wings, tails, & one feather on top of head. Use as many feathers as desired. Option: Before placing feather into hole, dip end of feather into glue to further anchor into Chick body.
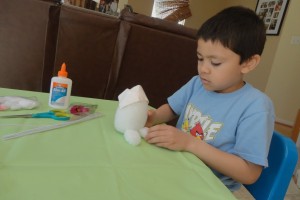
My six year old Gabriel had fun with these Easter projects, although these definitely require adult supervision. So if you're looking to get creative with duck tape, these projects are quite easy to make and are great ways to bond with your kids! 🙂
I will be featuring more Easter crafts this week, courtesy of A.C. Moore! So stay tuned in!
*Hip Mama's Place Disclosure: "My reviews and opinions are 100% my own. A.C. Moore provided me the supplies necessary to make these Easter projects."
 About the Author: Jocelyn Cañasa-Brown is a working mom of two boys and is a recognized blogger and mom influencer in the Washington, DC area. In her spare time, she designs and creates her own handmade jewelry, maintains her jewelry store on Etsy and is an active moms group organizer and leader both online and offline. Hip Mama's Place was nominated for Parents 2011 Best All-Around Mom Blog and named one of the Highest Rated Blogs and Sites on Nickelodeon ParentsConnect for the Washington, DC area. Follow Jocelyn on Twitter and/or Facebook.