A few springs ago, I was planning a baby shower for a friend and wanted a dessert that was as adorable as it was delicious. I didn’t want something overly complicated (because let’s be honest—who has the time?), but I wanted it to wow the guests. Enter: pastel cakesicles.
I’d seen them all over Pinterest and Instagram—those perfectly shaped, glossy little cake pops on a stick, dressed up in dreamy pastel colors. I thought they’d be a fun challenge, and let me tell you… Once I made that first batch, I was hooked. Not only did they look stunning, but they were surprisingly easy to put together. And the best part? Everyone raved about them.
Now I make these pastel cakesicles all the time—for birthday parties, Easter brunch, Mother’s Day, and sometimes, just for fun on a rainy Saturday. The best part? They’re a blank canvas for your creativity. If you love sweets that double as edible art, this one’s for you!
So, What Are Pastel Cakesicles?

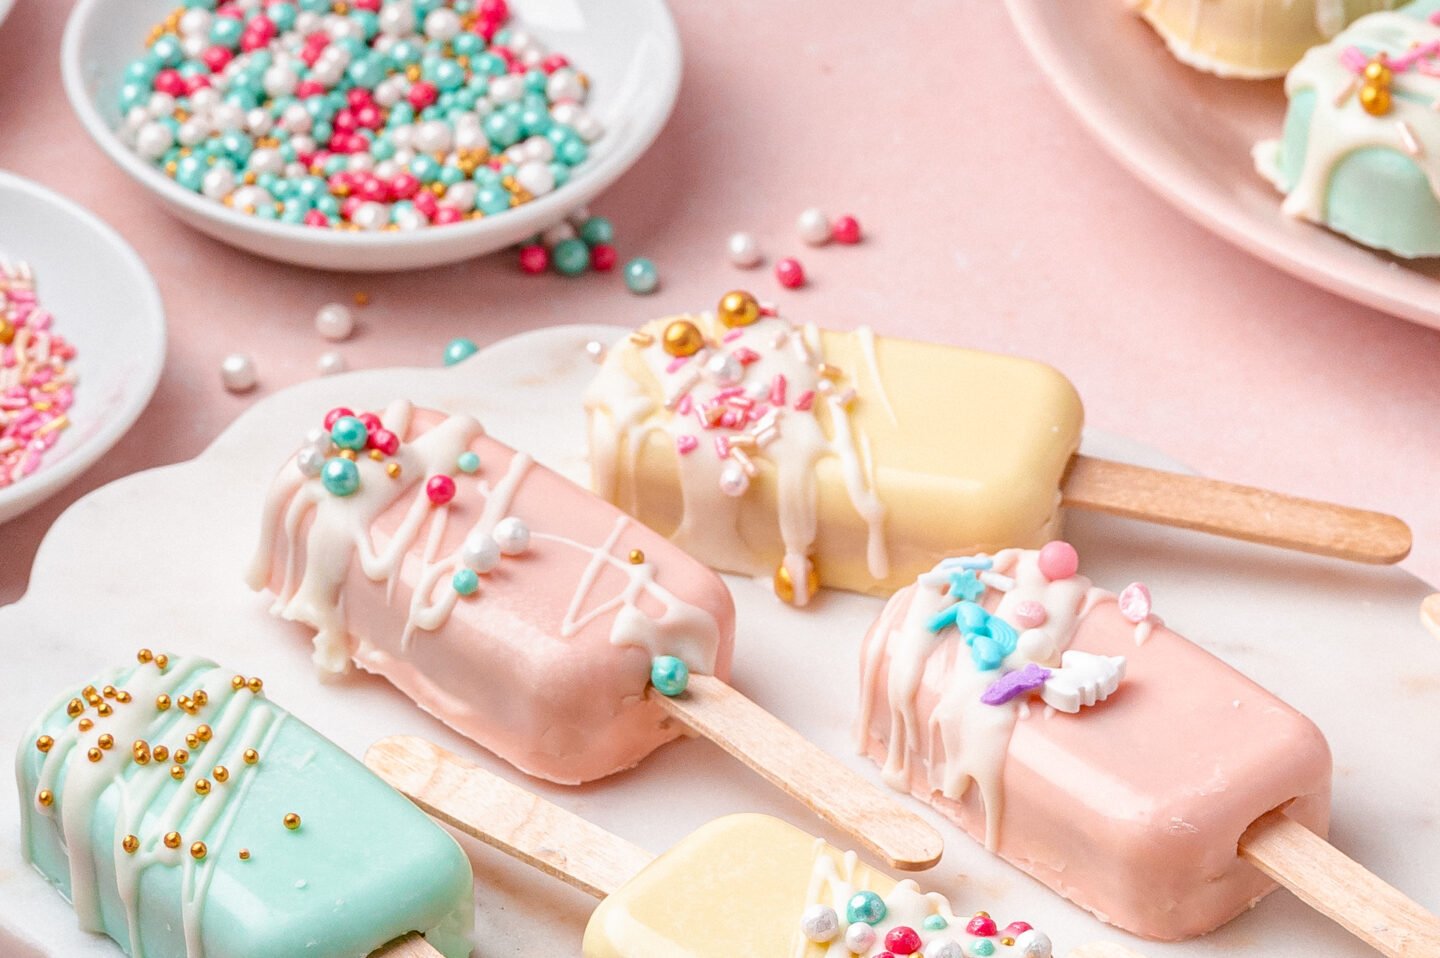
Think of cakesicles as the glow-up version of a classic cake pop. They’re made from a mix of crumbled cake and frosting, shaped in a silicone mold, and coated in a smooth candy melt shell. The pastel twist? Soft, cheerful colors like baby pink, lemon yellow, and robin’s egg blue make these treats stand out on any dessert table.
And they’re not just cute—they’re rich, moist, and so much fun to decorate! The process of making these pastel cakesicles is a delightful journey in itself, filled with colors, textures, and the joy of creating something beautiful and delicious.
Why You’ll Love This Pastel Cakesicles Recipe

Here’s why I keep this recipe in my “party go-to” folder:
- Super cute and customizable – You can switch up the colors, toppings, and even the cake flavor depending on your vibe or the event.
- No fancy baking required – A store-bought pound cake works just fine (no shame in shortcuts!).
- Kid-friendly and fun to make together – My niece loves decorating these with me.
- Perfect for special occasions – Easter, spring birthdays, gender reveals, baby showers—you name it!
How to Make Pastel Cakesicles
Making pastel cakesicles is easier than you might think—and so much fun! All you need is some cake, frosting, candy melts, and a silicone cakesicle mold to get started. With a little mixing, melting, and decorating, you’ll have a batch of colorful, party-ready treats that look like they came from a boutique bakery.
Ingredients You’ll Need

For the Cake Filling:
- 1 pound cake (store-bought or homemade)
- ½ cup buttercream frosting
For the Candy Coating:
- white candy melts
- Oil-based food coloring (pink, teal, yellow—think springtime shades)
- Coconut oil (optional, for thinning the candy melts if needed)
- Assorted sprinkles or edible decorations

Tools & Supplies:
- Silicone cakesicle molds
- Wooden Popsicle sticks
- Small food-safe brush
- Bench scraper or small spatula
- Squeeze bottles or piping bags
Step-by-Step: How to Make Pastel Cakesicles
Step 1: Mix Up the Cake Filling

Crumble the pound cake into a large bowl—use your hands or a fork and get it nice and fine.

Add in the buttercream and stir until the mixture holds together when pressed. You’re aiming for a texture like playdough (but tastier, of course!).
If you’re baking your own cake, let it cool completely first so it doesn’t melt the frosting.
Step 2: Melt and Color the Candy Coating

Place your white candy melts in a microwave-safe bowl. Heat in 30-second bursts at 50% power, stirring each time, until fully melted and smooth.
Too thick? Add a bit of coconut oil—just a teaspoon at a time—until you get a silky, pourable texture.

Now the fun part: divide the melted candy into a few bowls and tint each with your oil-based food coloring. Pastels don’t need much color—just a drop or two will do.
Pro Tip: Make sure you’re using oil-based food coloring—water-based colors can make the candy seize up.
Step 3: Coat the Molds

Spoon or pour the colored candy melts into the mold cavities, swirling gently to coat the sides evenly. Tap the mold lightly on the counter to pop any bubbles.
Insert your popsicle sticks about an inch in, and use a spatula or scraper to clean up the tops of the molds.
Chill the molds in the fridge for 5–10 minutes until the coating sets. Then check for any thin spots—if you see any, brush on another layer and chill again.
Step 4: Add the Cake Filling

Gently remove the popsicle sticks (you’ll put them back in a second). Take a small amount of the cake mixture and press it firmly into each mold cavity, leaving a little space at the top for sealing.
Reinsert the sticks and press them gently into the cake. They should feel secure.

Now, spoon more melted candy on top to seal the cakesicles and scrape away any excess with your spatula.
Pop the molds back into the fridge for 10–15 minutes or until completely set.
Step 5: Time to Decorate!

Once your cakesicles are fully set, carefully push them out of the molds. Hold the stick and gently press from the bottom—it helps avoid cracks.
If needed, re-melt your leftover candy melts and transfer to piping bags or squeeze bottles. Drizzle the pastel-colored chocolate across the tops and let it drip down the sides.

While the drizzle is still wet, sprinkle on decorations—rainbow sprinkles, pastel confetti, edible pearls… go wild!
Let everything sit at room temperature, and voilà! You’ve got the cutest pastel cakesicles ever.
My Tips for Picture-Perfect Pastel Cakesicles

I’ve made a lot of these, so here are a few little things that make a big difference:
- Work in small batches—once candy melts start setting, they don’t wait around!
- Use a clean scraper between coatings to avoid mixing colors or getting crumbs in the coating.
- Always check for thin spots in your shells—patch them before adding filling.
- Add sprinkles while the drizzle is wet for the best stick and sparkle.
- Let them come to room temperature before serving for the best texture and shine.
Fun Ways to Customize Your Cakesicles

Gender Reveal: Use pink or blue cake inside and a neutral outer shell for a surprise bite.
Spring Party: Decorate with mini edible flowers or piped buttercream blossoms.
Flavor Swap: Try lemon cake with vanilla frosting, chocolate cake with raspberry frosting, or even funfetti for a party vibe.
Fruit Pairing: Add a bit of jam or fruit puree to the cake mixture for a fruity surprise.
How to Store Your Cakesicles

These stores like a dream if you follow a few simple rules:
- Keep them in an airtight container at room temperature for up to 5 days.
- Avoid the fridge—it causes condensation and that dreaded chocolate “bloom” (you know, the chalky white coating).
- If your space is warm, you can chill them just until set, but let them come to room temperature before serving.
FAQs: Let’s Talk Cakesicles!

Can I freeze pastel cakesicles?
Technically, yes, but I don’t recommend it. The texture of both the chocolate and the cake can suffer in the freezer.
Can I make them ahead of time?
Absolutely! They’re great for prepping the day before an event. Just keep them cool and dry.
Do I need a special mold?
You’ll want a silicone cakesicle mold (Amazon has tons). It makes getting that perfect oval shape way easier than shaping by hand.
MORE SWEET TREATS TO TRY!
American Flag Brownie Cake
The Best Hot Chocolate Bombs
No Churn Strawberry Ice Cream {Easy and Delicious}
Classic Lemon Bars Recipe: Bright, Tangy & Perfectly Set
Orange Creamsicle Pie – Light, Creamy & Perfect for Summer
You Can Totally Make These!

Listen—if you’ve ever felt intimidated by desserts that look like they came from a bakery, this is your moment. These pastel cakesicles are doable, even if you’re not a pro. All you need is a mold, a little patience, and a splash of creativity.
They’re guaranteed to impress and bring a little joy wherever they go. (And bonus: kids love helping with the decorating!)
If you make them, I’d LOVE to see! Tag me on Instagram or drop a comment below.
Shop the Tools I Use (Affiliate Links)
-
Pastel Oil-Based Food Coloring Set
-
White Candy Melts
-
Pastel Sprinkle Pack
-
Cakesicle Molds – Oval Shape
-
Popsicle Sticks – 200 Pack
If you like this recipe for pastel cake pops on a stick – be sure to give it a review below! If you decide to try it, tag me on Instagram @hipmamasplace. I would love to see your creations!
Also don’t forget to follow Hip Mama’s Place on Facebook, Instagram, Pinterest, and Twitter!
This post may contain affiliate links. Hip Mama’s Place is a participant in the Amazon Services LLC Associates Program, an affiliate advertising program designed to provide a way for websites to earn advertising revenues by advertising and linking to Amazon.com and other retailers- at zero cost to you. You can learn more about our Privacy and Disclosure Policies HERE.

The Prettiest Pastel Cakesicles Ever {Step-by-Step Recipe You’ll Love!}
- Total Time: 0 hours
- Yield: 1 hour, 15 minutes 1x
Description
Learn how to make pastel cakesicles that are cute, colorful, and perfect for parties! This easy step-by-step tutorial includes tips for decorating, storage, and more.
Ingredients
For the cake:
1 pound cake (store bought or homemade)
1/2 cup buttercream frosting
For the coating and drips:
20 oz white candy melts
oil-based food coloring (pink,teal and yellow)
coconut oil (if needed for thinning chocolate)
Instructions
1. Prepare the Cake Filling
-
If baking your own cake, let it cool completely.
-
Crumble the cake into a large bowl.
-
Add buttercream and mix until the mixture is moist and holds together when pressed.
2. Melt and Color the Candy Coating
-
Place candy melts in a microwave-safe bowl.
-
Microwave at 50% power in 30-second intervals, stirring between each until smooth.
-
If the coating is too thick, stir in 1 tsp of coconut oil at a time until pourable.
-
Divide into separate bowls for each color (reserve ½ cup of white for drizzling).
-
Add a drop or two of oil-based food coloring to each bowl and stir.
3. Coat the Cakesicle Molds
-
Spoon or pour melted candy into each mold cavity.
-
Tap or swirl to evenly coat the sides and remove air bubbles.
-
Insert popsicle sticks about 1 inch in.
-
Scrape off excess chocolate using a spatula or scraper.
-
Refrigerate for 5–10 minutes until set. Add more coating if needed, then chill again.
4. Fill and Seal the Cakesicles
-
Remove sticks briefly. Press cake mixture into the hardened shells, leaving a gap at the top.
-
Reinsert sticks. Cover with more melted candy and smooth the tops.
-
Chill for 10–15 minutes until completely set.
5. Decorate
-
Carefully remove cakesicles from molds.
-
Re-melt any leftover candy and transfer to piping bags or squeeze bottles.
-
Drizzle over the cakesicles, then add sprinkles while the drizzle is still wet.
-
Let sit at room temperature until decorations are firm.
Notes
Work in small batches to prevent chocolate from setting too quickly.
Clean your scraper between uses for neat edges.
Double-check for thin spots in the shell before adding the cake mixture.
Add sprinkles and decorations while the chocolate is still wet for best adhesion.
- Prep Time: 45 minutes
- Cook Time: 30 minutes Chill time
- Category: Desserts
- Method: Baking
- Cuisine: American
A former school teacher, Jocelyn Brown created Hip Mama’s Place in 2007. Her motto for this blog is: get inspired, create and share! Jocelyn loves sharing about food and recipes, crafts, DIY projects and her random travels with her family. She also loves all things social media, but her latest obsession is Instagram.
Find me on: Web


These cake-sicles are so cute! My daughter will love these for her birthday party. Thanks for this amazing idea and recipe.
These are perfection and what a great treat for the classroom parties too…. the kids will hop wild for them! I think they are almost too cute to eat….. and that is an almost LOL because I know they are yummy too!
this is such a gorgeous dessert. the kids are going to love these when we make them this weekend. p.s. thanks for the coconut oil tip.
I love how fun and playful they are, and the pastel colors make them perfect for spring parties or baby showers. Honestly, I had no idea cakesicles were this easy to make… now I kinda want to try them just for a cozy weekend baking project. So sweet and creative!
These look so beautiful! I have a family member who is experimenting in the kitchen and she might enjoy making these! I will definitely help of course (with eating them! lol. Just kidding!). My father has been telling me I need to try making my own treats to save a little money. He is absolutely right! These are wonderful and look easy to make! Unfortunately, I’m so clumsy I’m afraid I’ll find some way to mess them up! lol. Thankyou for sharing!
Wow! I’m charmed by how these pastel cakesicles turned out—each one looks like a whimsical bite of joy, and the smooth chocolate coating over moist cake is just irresistible.
I agree, these are so pretty! I love the colors. I am excited to make them with my kids.
These look so cute and delicious! I’m loving the colors too. I can’t wait to try this recipe. Thanks for sharing.
You weren’t kidding about it being the prettiest. I literally couldn’t take my eyes off of this beauty.
Oh, these cakesicles look almost too cute to eat! I love the pastel colors, and they look so delicious.
Cake and all my favourite pastel colours… I’m giving this a go for sure. They look yummy!
Those cakesicles are so pretty and the best part is they won’t melt like a real popsicle! They would be great for a shower!